Data about contacts and leads from Microsoft Dynamics 365 can be incorporated into Dialog Insight projects using this integration. This feature retrieves contacts or prospects from your Dynamics platform to use them in campaigns, segmentation, personalization, and other features from Dialog Insight. When a contact is added or modified in the third-party system, real-time data is added to the Dialog Insight project. In a single project dedicated to this integration, a first import is required to restore the initial state of Microsoft Dynamics 365 contact or prospect data. Be aware that no data is transmitted from Dialog Insight to the Microsoft Dynamics solution.
Requirements
- Create a Portal Azure account
- Use a project that has a client no. primary key. It is possible to use another type of primary key (email or other), but it will be more complex to manage duplicates in your project since the primary key for contacts in Dynamics 365 is a client number (type varchar 36).
Should I create a dedicated project for Microsoft Dynamics 365? This depends on whether you need to separate the contacts coming from this data source. In general, it is not recommended to configure more than one Dialog Insight integration within the same project, as this can lead to data conflicts, mapping issues, or unpredictable behavior during synchronization. In a CDP structure, if you want to distinguish contacts coming from different sources, it is recommended to create a dedicated source project for Microsoft Dynamics 365. This project will then act as an independent source whose data can be pushed into your unified project. you could use a source project for Leads and another for Contacts. If you’re unsure of the best approach for your situation, feel free to contact our team for guidance tailored to your specific context. |
Step 1: Configure a Service Bus Azure
The purpose of this system is to collect events into a waiting list so that the Dialog Insight system processes them one at a time. If you wish to synchronize contacts AND leads, you must configure a separate service bus for each type.
Note: It is strongly recommended that a member of your IT team manage the Azure Service Bus. A certain level of technical knowledge is needed for this configuration. You are welcome to ask us for assistance in this process as well.
Configuration
1.1 Service Bus Creation Page
On your Azure Portal account, find the Service Bus creation page. You can find it by using the word "bus" in the search bar above:
1.2 Service Bus namespace
If you do not yet have a Service Bus namespace, create one now. If you already have one, select it and go to the next step.
Click Create service bus namespace or + Create:

Configure the namespace of the Service Bus:

1.3 Queue Creation
Go to the resource's page:
Create a new queue:
- Fill-in the name. The name is linked to the data to synchronize (e.g. Contact).
- Enter a maximum delivery count to specify how many times it will attempt to send the same message without success before giving up.
1.4 Send Access Policy
Once the queue is created, create an access policy with the Send permission for the Dynamics plugin:
- Add a name for the policy.
- Check the Send option.
- Click Create.
*If you have a CDP structure, and you want to synchronize data from 2 different secondary projects, you must create a queue for each project (e.g. A Contacts queue for the secondary project containing contact data and a Leads queue for the project containing lead data).
1.5 Listen Access Policy
Create an access policy with the Listen permission for the DiaIog Insight platform. Go to the page of the queue you just created. Select Shared access policies in the left menu and click + Add: 
- Add a name for the policy.
- Check the Listen option.
- Click Create.
1.6 Primary Connection String Field
Note the Primary Connection String for the two access policies you just created (or only one if you don't synchronize both). These will be used throughout the remaining steps.
Step 2: Configure the Dialog Insight Plugin
This part of the integration gathers real-time updates for contacts and leads and sends this data to an Azure Service Bus instance, where our service retrieves it and integrates it into the platform.
Before starting, make sure to have access to the Microsoft Dynamics 365 account in the Plugin Registration Tool.
Note: It is strongly recommended that a member of your IT team handle this configuration.
2.1 Registration Tool Plugin
Download and install the plugin using the instructions for the Registration Tool plugin. Once the installation is completed, go to the Tools/PluginRegistration folder.
Launch the PluginRegistration app and click + CREATE NEW CONNECTION, then fill out your login details: If you use an SSO connection, leave the username and password fields empty, then click Login.
2.2 Azure Service Bus Endpoint Register
Click on the Register tab and select the Register New Service Endpoint option:
Enter the Connection string retrieved in step 1.6 for the Send policy and click Next:
Register an endpoint for the contacts and another for leads: Make sure to use the correct queue name for the Service Bus that corresponds to the data you want to synchronize (Contacts or Leads).
2.3 JSON Response
Login to Dynamics 365 and go to:
[organizationUri]/api/data/v9.0/serviceendpoints?$select=name,description,serviceendpointid
You should get a response that looks like this: You must extract the the JSON for the serviceendpointid for contacts and leads depending on your use case.
2.4 New Assembly
Click Register New Assembly: You only have to do step 2.8 only once, even if you synchronize both sources (contacts and leads).
Download the file DialogInsight.SynchronizationPlugin.dll available at the end of this article.
Upload this file by clicking Load Assembly:
It's possible that the PPlugin Registration Tool refuses the file indicating that it comes from another computer. You can unblock by clicking Unblock in the file properties (right click the file):
2.5 Steps Register
Register the steps for the data to synchronize. Select the plugin in the list:
Register the following steps for Contacts:
Step 1: Create contact
Step 2: Update contact
Step 3: Delete contact
Here is an example for Create contact: In the Unsecure Configuration section paste the servicenedpointid corresponding to Contacts or Leads.
If you also synchronize leads, create the following steps:
Step 1: Create lead
Step 2: Update lead
Step 3: Delete lead
For the Update contact and the Update lead, make a right click and select Register New Image. Add "Postimage" in the Name and Entry Alias fields:
Click the 3 dots for the parameters and select all attributes except traversedpath.
For the Delete Contact and the Delete lead, create a PremImage:
Step 3: Connect the Integration in Dialog Insight
You can specify in which instance of the Azure Service Bus to fetch the data and link the fields between Microsoft Dynamics 365 and Dialog Insight using this integration component.
3.1 Connection
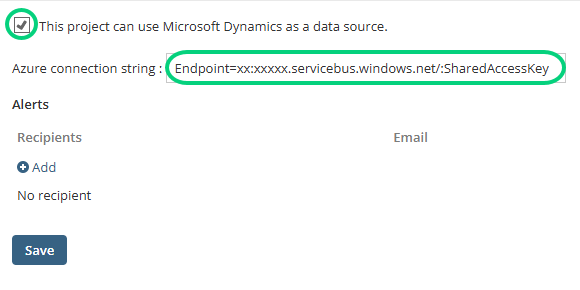
In Dialog Insight, go to the integration list (Project → Data Management → Integrations) and the + at the end of the line of the Dynamics 365 integration, then click Create a connection:
Add the Listen connection string from the Azure Service Bus:
3.2 Data Source
Add a data source for Contacts or for Leads:
 For each secondary project that has a source in Dynamics (ideally, a secondary project for Leads and another for Contacts), you must configure a connection string for each project. Go in the secondary project and click Rendez-vous dans le projet source et cliquez sur Service d'écoute :
Add the queue name as the name you assigned in Azure Portal:
You can find the queue name here:
3.3 Field Mapping
Click Mapping:
For each field, indicate the source in Dynamics 365 and the destination in DI: If the field is the primary key, check the Primary key checkbox.
You could also map custom fields by selecting External field in Source of the field.
3.4 First Load
After establishing the connection, your Dialog Insight project does not yet contain data. To fetch the data, perform a manual import. In Dynamics, export the Contacts or Leads table, then import it in the corresponding Dialog Insight project.If you do not perform an import, the system will only synchronize changes happening after the setting up of the connection between Dialog Insight and Dynamics. Thus, when a contact is added or updated, these changes will be synchronized. 
Statut
Online: The service bus is listening for changes.
Waiting: The service bus is paused (it could be caused by system maintenance).
Offline: The connection between Dialog Insight and Dynamics is not activated.